
CAMO MARKSMAN Pro, Deck Tool for Edge Fastening Installation, 3/16″ Spacing, Fits 5-1/4-5-3/4″ Composite Decking (0345001)…
$54.95
Related Products


Product description


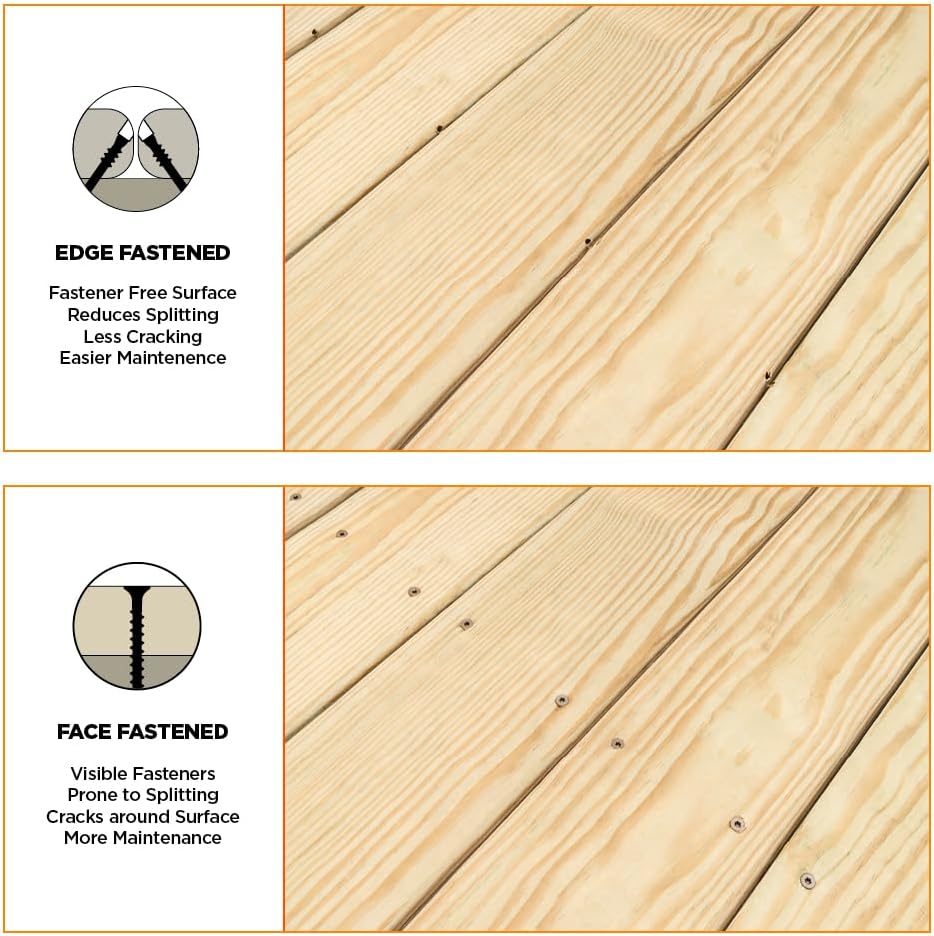
Fastener Free Deck Surface with CAMO MARKSMAN System
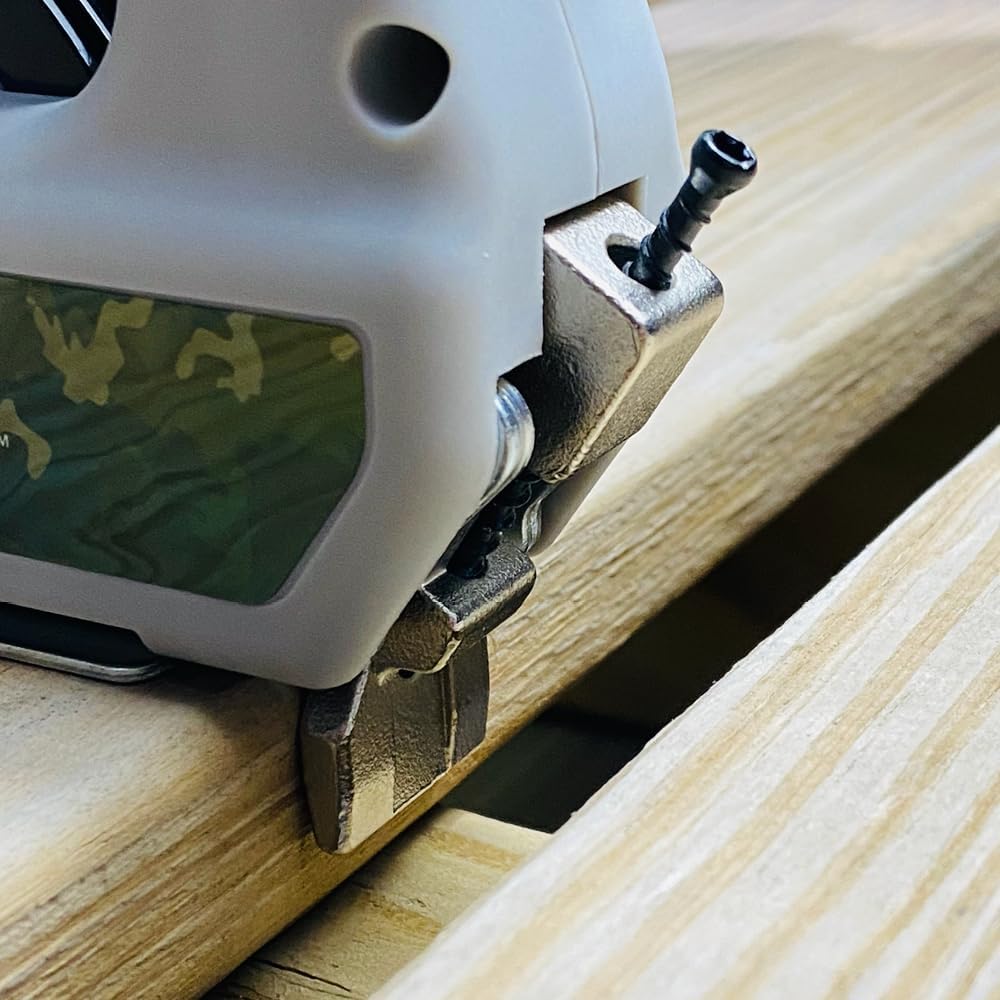
The MARKSMAN system makes it easy to fasten CAMO Edge hidden deck screws. Simply set the tool, drop your deck screws in each fastener slot, and drive.
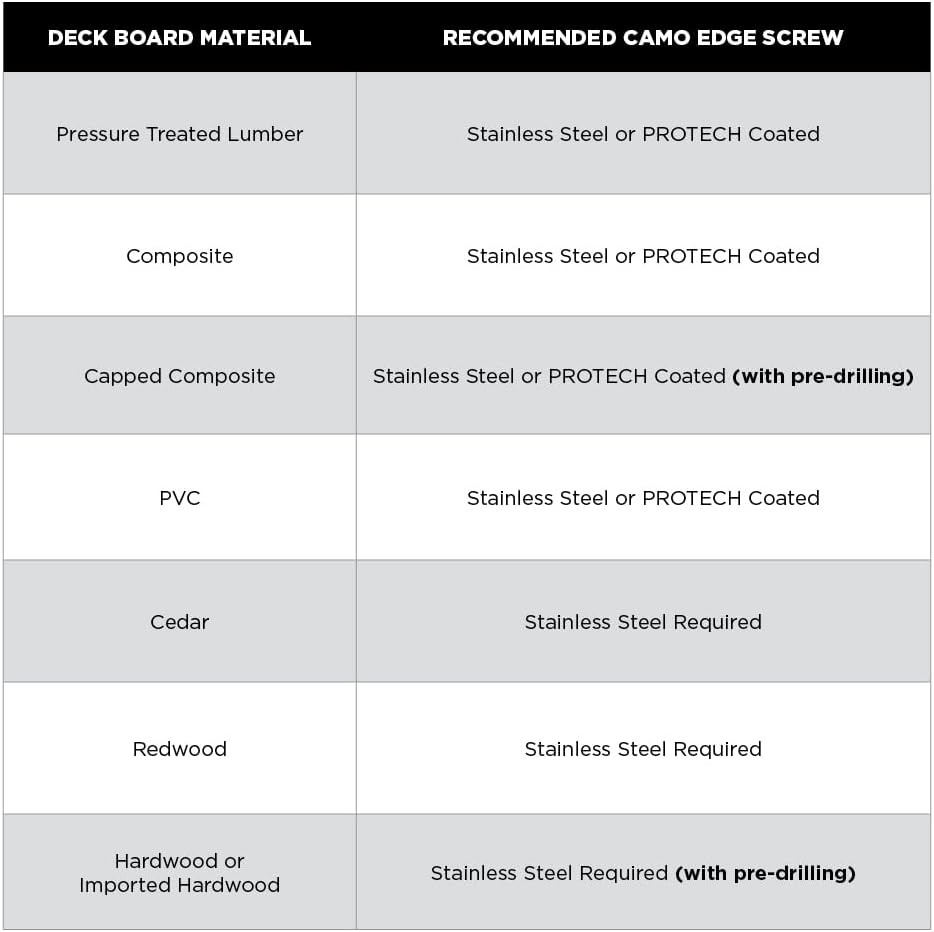
Jig that allows fasteners to be installed on the edge of the board, for a fastener-free deck topAutomatic spacing based on tool chosen (see below)Edge deck screws reduce splitting, cracking, and maintenance for a barefoot approved deck topSuitable for pressure-treated lumber, cedar, hardwood, PVC, composite or synthetic boardsNo-slip grip action holds the tool securely to the deck board while fasteningDual screw guides fasten both sides of the deck board with single tool placementFor best results, predrill hardwood and capped composite deck boardsDriver bits are included in each pail of CAMO Edge hidden deck screws
3 Easy Steps for a Fastener-Free Deck Surface

Step 1: Set The Tool
Simply position the tool over a joist and clamp the Marksman to treated deck board. The clamp automatically creates spacing for the ideal gap (based on the tool chosen, see below).

Step 2: Drop In Screws
Load 2 CAMO Edge Deck Screws into the built-in guides. These screws feature a rake tip to auger out material and prevent splitting.

Step 3: Drive Screws
Attach the included driver bit to your drill and drive both screws. Don’t worry about overdriving as the built-in shoulder will stop at the perfect depth automatically.
The Marksman System

PRO-X1
For use with Treated Lumber deck boards. Provides a 1/16″ gap. Fits any 5-1/4 in. (133mm) to 5-3/4 in. (146mm) deck board.

PRO
For use with Composite decking. Provides a 3/16″ gap. Fits any 5-1/4 in. (133mm) to 5-3/4 in. (146mm) deck board.

PRO-NB
For use with Narrow Board hardwood, composite, PVC, cedar and treated lumber deck boards. Fits any 3-1/4 in. (83mm) to 5 in. (127mm) deck board. Provides 3/16 in. (5mm) spacing

EDGE
Use for No Gap installations. Designed for use with pressure-treated and other softwood lumber. Attaches to any drill.


CLIPS
Simple, Strong, Hidden. CAMO hidden deck clips are the best way to install grooved decking. Designed and warranted for use with all leading grooved decking.

LEVER
Build a better deck by yourself with LEVER, the one-turn tool that locks-in rows of boards and clips and straightens warped boards.

ClipDRIVE
Smarter, Faster, Easier. Fasten CAMO universal deck clips up to 5x faster all while standing and saving your back.
Use exclusively with CAMO Edge hidden deck screws deck fastening system
Jig that allows CAMO edge decking screws to be installed on the edge of the board, for a fastener-free deck top
Edge star drive deck screws reduce splitting, cracking, and maintenance for a barefoot fastener free deck surface
Suitable for cedar, hardwood, PVC, composite or synthetic boards
3/16 in. automatic deck board gap spacing for material expansion and contraction when installing dry wood (cedar, hardwoods, etc) and composite boards
9 reviews for CAMO MARKSMAN Pro, Deck Tool for Edge Fastening Installation, 3/16″ Spacing, Fits 5-1/4-5-3/4″ Composite Decking (0345001)…
Add a review
$54.95
Robert –
Great Tool!
Background – I needed to resurface a deck. We decided on using a PVC product from the local big box. The material had a lifetime warranty and a good price. The deck was 12 by 20 feet. I was doing the job alone and I have never done a deck before.The Tool – I found the deck to be of high quality and I did the complete deck and the tool shows no signs of wear. The bit, on the other hand, shows shaft wear but no tip wear. I used one screw driver shaft for the entire job, although I purchased the two pack CAMO TORX DRV BIT 2PK. I did not buy the pro kit, so I did have to buy these separately. I do feel however that it should be included with the tool. -1/2 STARInstructions – I have to admit, I did not spend much time reading the instructions. I did look at the company website’s videos. These were adequate.Set-up – There is really only one adjustment to set the spacer to the width of the board. Once you set this for your board width, you are done.Use – Basically you pull the grip, set it on the board, set a screw into each guide hole, and drill. The tool has a built in spacer and it is important that you get the board set correctly. It is also important that you ensure that the tool is flat against the board. If it is not flat, you will not get the desired results. Drill at a steady speed with constant pressure until the bit bottoms in the tool, then repeat. NOTE – you must use the screws that go with this system. CAMO Deck Screws 1-7/8″ x 7# 350 ct pack [CAPITOL CITY LUMBER] While doing this, I kept steady pressure on the tool to hold in place, but it is not designed for your entire body weight. I did notice that no matter how hard I tried, the tool would move due to the torque of the screw. Once I figured that out, I adjusted placement for the effect and had no issues.Results – See my pictures. It looks great. You can see the screws between the boards if you look closely between the boards, but to the the person casually using your deck, I doubt they would notice the screws.Removal – I read another review that said it was impossible to remove the screws. I actually found this not to be the case with one exception. As long as your screw goes into something, it can be removed. If you miss the joist completely, you can still remove it, but you will have to have someone climb under the deck and provide pressure with a piece of wood. It does take patience to remove the screws because the tip of the driver must be in the counter-sunk screw head completely. Since you are doing this in the blind, take your time and you will be able to remove any board you want (And yes, I know this from experience).Recommendation – I recommend this product and would purchase it again. Not only does it allow the “hidden fastener” look, but allows you to remove a single board without having to remove a significant section of your deck. It was also very easy to use.
Drew C –
Life Changing!
Works great. The screws go in easily and are hidden. I am replacing a large deck and for 30 years I have tightened screws every year and have not liked how my deck looks. I am very glad to get rid of the old surface screws. This product has honestly made my life better!
JED42 –
Coolest Tool Ever
I own a small remodeling company in the midewest. I have installed decking with every fastener imaginable: Face nailed, face screwed, clips that go under the decking, hidden clips on the side, in a groove, biscuits…you name it. None of them work correctly every time. The gaps aren’t consistent, the screws don’t drive in correctly, you have to place a spacer in between each board before nailing etc. This tool eliminates all of it. No clips, no spacers nothing. Material is screwed to the joists. Done.I bought 2 of the tools and had my guys work together…one sets ahead and loads screws, one drives them in and hands the tool off to be reloaded. With this system, we screwed down a 1200 sq’ deck in less than half the time it would take to use clips, and in about the same time as face screwing without the measuring, countersinking etc.The tool is light and pretty well built. I have used them on two large decks in 2 weeks and it shows no sign of wear (like I thought it would). The screws cost about as much as face nail screws, so you don’t overspend there. We used this with Azek and composite decking. The holes never got clogged (though I think they would with Ipe or other wood).The screws have conventional right hand threads on the bottom and self drill. The top (that embeds in the decking) has left hand threads that force the plank down to the joists. There was no riding up, and they held superbly. On the first piece we installed, we left about 12″ overhang…I pushed up on it as hard as I could to try and get them to fail…not happening. I think the piece would’ve broken before the screws let out – and @ $10/sq’for the decking, I decided to stop before that happened.Learning curve: Make sure you take time to set the tool up before starting, to ensure it is tight at the width you want it. also, you HAVE to make sure the tool is held tight to the decking before driving, or the screw will enter at the corner (where you can see it).Best parts: Fast, easy to use…and if something happens to a piece in the middle of the deck, you don’t have to remove the whole deck back to it. You just take the screws out of the piece you want, and it comes right out. The 3/16 pre-gap piece.After two decks, I am still using the first two drivers I took out of the box. I also thought these would wear out quickly, but so far so good.Homeowners – worth the $50 for the tool, even if you only use it for one deck.Contractors – You’re gonna love this tool. Time saver, good selling point, neat tool all around. IF I had to buy this tool with every deck I’d do it, but I think this one will last at least most of the summer. My guys love it because it’s so easy, and homeowners love the hidden fastener part of it, as well as the “remove one piece in the middle” part too.Overall: Very cool tool.
ssparkd –
Good tool
I am cautiously optimistic about the results of this tool. I used PT 5 &3.4″ lumber boards. On occasion, there was evidence of splitting but mainly, the screws went in clean. The tool design is easy to use. It sets the distance between boards by ensuring flat contact. One thing I would do to improve the design is change the handle from open at one end to closed at both. That way you can apply equal pressure and ensure both ends are down. The issue is that the handle flexes and you may think it is down tight, but due to board curves, the guide at the open end isn’t. This causes your screw to go into the board from the top edge instead of the side. When you get tired of putting them in, it is easy to make this mistake. Equal pressure on the handle may eliminate this. I removed old boards from a deck and subsequently had old screws in the joists. If you hit an old screw it can be trouble as the screw you are putting in won’t go in and becomes difficult to remove. And now the tool is locked in place with the screw. This has only occurred a couple times and after playing around with it, I have been able to remove the tool and get the screw in. I’d also improve the indicator for where the screw is going to go. On the end of the boards when you are mating on a single joist, you don’t have much room to hit the end. Better indication of where you are aligning would be useful. My cautious optimism is how the screws grabbing only the side of the boards are going to hold up winter after winter or as the boards age, etc.
Arnaud David –
Très Bon produit je le recommande
Stefano –
Ottimo prodotto, facilita notevolmente il fissaggio senza far vedere le viti, necessita di viti adeguate.
Weigt –
Nicht für profis
Amazon Customer –
Excellent tool, so easy.
Chris –
I’ve finished half my deck with this and it looks fantastic. Super easy to use.You won’t be able to use it on the inside edge of the deck boards closest to the house so you’ll probably have to face screw them.Also make sure you nail your measurements because you cant really make up space as you go – if you wanted a space thinner than the tool spacers your kind of screwed 😉